用win-acme生成免费的泛域名证书-腾讯云域名
域名为腾讯云域名步骤:
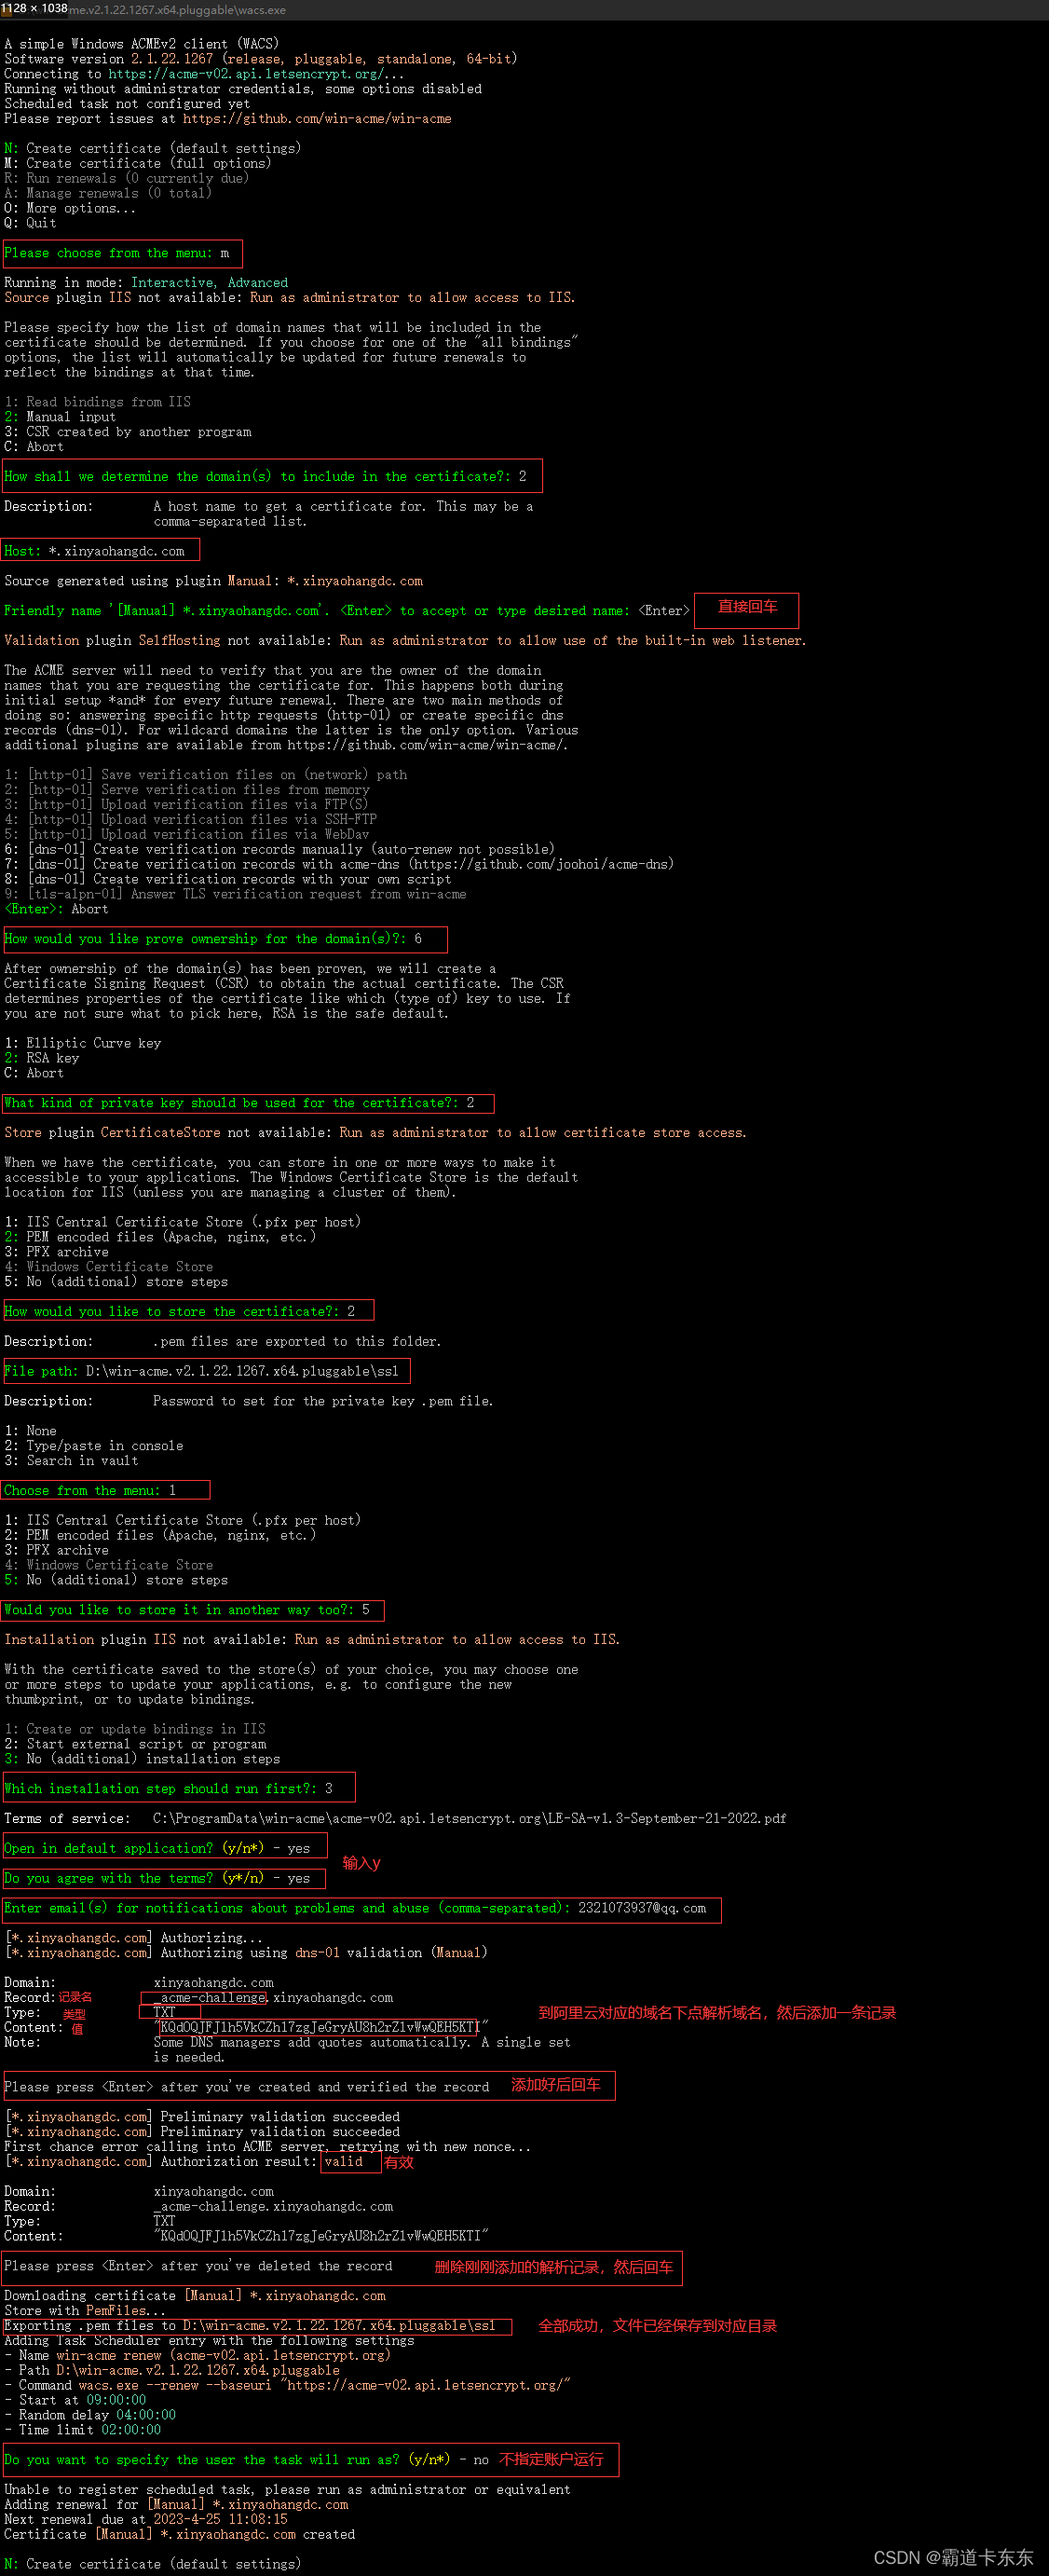
1、选择菜单
依次为:
N:Create certificate(default settings)--创建证书默认
M:Create certificate(full options)--创建证书全配置
R:Run renewals (0 currently due)--运行自动更新任务
A:Manage renewals (0 total)--自动更新任务管理
0:More options...--更多设置
Q:Quit--退出
默认是使用iis服务器配置的,本人使用的ng所以输入m
1:Read bindings from IIS--从 IIS 读取绑定
2:Manual input--手动输入
3:CSR created by another program--由另一个进程创建的 CSR
C:Abort--中止
使用nginx所以输入2
输入域名:*.example.com
再次回车
选择脚本命令 8
输入脚本路径 ./DNSPod.ps1
脚本是一个文件所以选择1
输入脚本的添加方法名称以及所需参数:create {RecordName} {Token}
输入脚本的删除方法名称以及所需参数:delete {RecordName} {Token}
1:Run everything one by one(default)--逐个运行所有内容(默认)
2:Allow multiple instances of the script to run at the same time--允许脚本的多个实例同时运行
3:Allow multiple records to be validated at the same time--允许同时验证多个记录
4:Allow both modes of parallelism--允许两种并行模式
这个脚本写的简单,所以选1
选择nginx使用类型
选择RSA key类型
输入生成文件放置位置
选择1不设置密码
选择5不再设置
选择3不设置安装
涉及用户名或者密码直接回车
脚本里面的id和token为腾讯云的api,token申请地址→https://console.dnspod.cn/account/token/token
脚本
<#
.SYNOPSIS
Add or remove a DNS TXT record to EasyDNS
.DESCRIPTION
Note that this script is intended to be run via the install script plugin from win-acme via the batch script wrapper.
As such, we use positional parameters to avoid issues with using a dash in the cmd line.

This script was copied and modified from the Posh-ACME repository.
Please reference their license terms for use/modification:  https://github.com/rmbolger/Posh-ACME/blob/main/LICENSE

Credit for the original script goes to RMBolger, Thanks!


.PARAMETER RecordName
The fully qualified name of the TXT record.

.PARAMETER TxtValue
The value of the TXT record.

.PARAMETER EDToken
The EasyDNS API Token.

.PARAMETER EDKey
The EasyDNS API Key.

.PARAMETER EDUseSandbox
If specified, the plugin runs against the EasyDNS Sandbox environment instead of the Live environment.

.PARAMETER ExtraParams
This parameter can be ignored and is only used to prevent errors when splatting with more parameters than this function supports.


.EXAMPLE

EasyDNS.ps1 create {RecordName} {Token} EDToken EDKey

EasyDNS.ps1 delete {RecordName} {Token} EDToken EDKey

.NOTES

#>
param(
    [string]$Task,
    [string]$RecordName,
    [string]$TxtValue,
    [string]$DNSPodKeyId='你的id',
    [string]$DNSPodKeyToken='你的Token',
    [string]$DNSPodKeyTokenInsecure,
    [string]$DNSPodApiRoot='https://dnsapi.cn',
    [pscredential]$DNSPodCredential,
    [string]$DNSPodUsername,
    [string]$DNSPodPwdInsecure
)

function Get-CurrentPluginType { 'dns-01' }

function Add-DnsTxt {
    [CmdletBinding(DefaultParameterSetName = 'Secure')]
    param(
        [Parameter(Mandatory,Position=0)]
        [string]$RecordName,
        [Parameter(Mandatory,Position=1)]
        [string]$TxtValue,
        [string]$DNSPodKeyId='你的id',
        [string]$DNSPodKeyToken='你的Token',
        [string]$DNSPodApiRoot='https://dnsapi.cn',
        [Parameter(ParameterSetName='Obsolete_DO_NOT_USE',Mandatory)]
        [pscredential]$DNSPodCredential,
        [Parameter(ParameterSetName='Obsolete_DO_NOT_USE',Mandatory)]
        [string]$DNSPodUsername,
        [Parameter(ParameterSetName='Obsolete_DO_NOT_USE',Mandatory)]
        [string]$DNSPodPwdInsecure,
        [Parameter(ValueFromRemainingArguments)]
        $ExtraParams
    )

    if ('Obsolete_DO_NOT_USE' -eq $PSCmdlet.ParameterSetName) {
        throw "DNSPod requires updated API Key/Token values. See user guide for details."
    }

    # build the login_token value

    $authToken = "$DNSPodKeyId%2C$DNSPodKeyToken"

    try {
        Write-Verbose "Searching for existing TXT record"
        $zone, $rec = Get-DNSPodTxtRecord $RecordName $TxtValue $authToken $DNSPodApiRoot
    }
    catch { throw }

    if ($rec) {
        Write-Debug "Record $RecordName already contains $TxtValue. Nothing to do."
    }
    else {
        # add a new record
        try {
            Write-Verbose "Adding $RecordName with value $TxtValue"

            $recShort = ($RecordName -ireplace [regex]::Escape($zone.name), [string]::Empty).TrimEnd('.')
            $addQuery = @{
                Uri = "$DNSPodApiRoot/Record.Create"
                Method = 'POST'
                Body = "domain_id=$($zone.id)&sub_domain=$recShort&record_type=TXT&value=$TxtValue&record_line=%E9%BB%98%E8%AE%A4&login_token=$authToken&format=json&lang=en"
                UserAgent = $script:USER_AGENT
                ErrorAction = 'Stop'
            }
            #Write-Verbose ($addQuery.Body)
            $response = Invoke-RestMethod @addQuery

            if ($response.status.code -ne 1 -and $response.status.code -ne 31) {
                Write-Verbose ($response | ConvertTo-Json -dep 10)
                throw $response.status.message
            }
        }
        catch { throw }
    }

    <#
    .SYNOPSIS
        Add a DNS TXT record to DNSPod.

    .DESCRIPTION
        Uses the DNSPod DNS API to add a DNS TXT record.

    .PARAMETER RecordName
        The fully qualified name of the TXT record.

    .PARAMETER TxtValue
        The value of the TXT record.

    .PARAMETER DNSPodKeyId
        The API Key ID value.

    .PARAMETER DNSPodKeyToken
        The API Key Token value as a SecureString value.

    .PARAMETER DNSPodKeyTokenInsecure
        (DEPRECATED) The API Key Token value as a standard String value.

    .PARAMETER DNSPodApiRoot
        The root URL for the DNSPod API you are using. Default to "https://api.dnspod.com" but may also be set to "https://dnsapi.cn".

    .PARAMETER DNSPodCredential
        Obsolete parameter that no longer works with DNSPod API. Do not use.

    .PARAMETER DNSPodUsername
        Obsolete parameter that no longer works with DNSPod API. Do not use.

    .PARAMETER DNSPodPwdInsecure
        Obsolete parameter that no longer works with DNSPod API. Do not use.

    .PARAMETER ExtraParams
        This parameter can be ignored and is only used to prevent errors when splatting with more parameters than this function supports.

    .EXAMPLE
        Add-DnsTxt '_acme-challenge.example.com' 'txt-value' -DNSPodKeyId '1' -DnsPodKeyToken (Read-Host -AsSecureString)

        Adds a TXT record for the specified site with the specified value using a secure token value.
    #>
}

function Remove-DnsTxt {
    [CmdletBinding(DefaultParameterSetName = 'Secure')]
    param(
        [Parameter(Mandatory,Position=0)]
        [string]$RecordName,
        [Parameter(Mandatory,Position=1)]
        [string]$TxtValue,
        [string]$DNSPodKeyId='你的id',
        [string]$DNSPodKeyToken='你的Token',
        [string]$DNSPodApiRoot='https://dnsapi.cn',
        [Parameter(ParameterSetName='Obsolete_DO_NOT_USE',Mandatory)]
        [pscredential]$DNSPodCredential,
        [Parameter(ParameterSetName='Obsolete_DO_NOT_USE',Mandatory)]
        [string]$DNSPodUsername,
        [Parameter(ParameterSetName='Obsolete_DO_NOT_USE',Mandatory)]
        [string]$DNSPodPwdInsecure,
        [Parameter(ValueFromRemainingArguments)]
        $ExtraParams
    )

    if ('Obsolete_DO_NOT_USE' -eq $PSCmdlet.ParameterSetName) {
        throw "DNSPod requires updated API Key/Token values. See user guide for details."
    }

    # build the login_token value
    $authToken = "$DNSPodKeyId%2C$DNSPodKeyToken"

    try {
        Write-Verbose "Searching for existing TXT record"
        $zone, $rec = Get-DNSPodTxtRecord $RecordName $TxtValue $authToken $DNSPodApiRoot
    }
    catch { throw }

    if ($rec) {
        # delete the record
        try {
            Write-Verbose "Removing $RecordName with value $TxtValue"

            $delQuery = @{
                Uri = "$DNSPodApiRoot/Record.Remove"
                Method = 'POST'
                Body = "domain_id=$($zone.id)&record_id=$($rec.id)&login_token=$authToken&format=json&lang=en"
                UserAgent = $script:USER_AGENT
                ErrorAction = 'Stop'
            }
            $response = Invoke-RestMethod @delQuery

            if ($response.status.code -ne 1 -and $response.status.code -ne 8) {
                throw $response.status.message
            }
        }
        catch { throw }
    }
    else {
        Write-Debug "Record $RecordName with value $TxtValue doesn't exist. Nothing to do."
    }

    <#
    .SYNOPSIS
        Remove a DNS TXT record from DNSPod.

    .DESCRIPTION
        Uses the DNSPod DNS API to remove a DNS TXT record.

    .PARAMETER RecordName
        The fully qualified name of the TXT record.

    .PARAMETER TxtValue
        The value of the TXT record.

    .PARAMETER DNSPodKeyId
        The API Key ID value.

    .PARAMETER DNSPodKeyToken
        The API Key Token value as a SecureString value.

    .PARAMETER DNSPodKeyTokenInsecure
        (DEPRECATED) The API Key Token value as a standard String value.

    .PARAMETER DNSPodApiRoot
        The root URL for the DNSPod API you are using. Default to "https://api.dnspod.com" but may also be set to "https://dnsapi.cn".

    .PARAMETER DNSPodCredential
        Obsolete parameter that no longer works with DNSPod API. Do not use.

    .PARAMETER DNSPodUsername
        Obsolete parameter that no longer works with DNSPod API. Do not use.

    .PARAMETER DNSPodPwdInsecure
        Obsolete parameter that no longer works with DNSPod API. Do not use.

    .PARAMETER ExtraParams
        This parameter can be ignored and is only used to prevent errors when splatting with more parameters than this function supports.

    .EXAMPLE
        Remove-DnsTxt '_acme-challenge.example.com' 'txt-value' -DNSPodKeyId '1' -DnsPodKeyToken (Read-Host -AsSecureString)

        Removes a TXT record for the specified site with the specified value using a secure token value.
    #>
}

function Save-DnsTxt {
    [CmdletBinding()]
    param(
        [Parameter(ValueFromRemainingArguments)]
        $ExtraParams
    )
    <#
    .SYNOPSIS
        Not required.

    .DESCRIPTION
        This provider does not require calling this function to commit changes to DNS records.

    .PARAMETER ExtraParams
        This parameter can be ignored and is only used to prevent errors when splatting with more parameters than this function supports.
    #>
}

############################
# Helper Functions
############################

# API Docs
# https://docs.dnspod.cn/api

function Get-DNSPodTxtRecord {
    [CmdletBinding()]
    param(
        [Parameter(Mandatory,Position=0)]
        [string]$RecordName,
        [Parameter(Mandatory,Position=1)]
        [string]$TxtValue,
        [Parameter(Mandatory,Position=2)]
        [string]$LoginToken,
        [Parameter(Mandatory,Position=3)]
        [string]$ApiRoot
    )

    # setup a module variable to cache the record to zone mapping
    # so it's quicker to find later
    if (!$script:DNSPodRecordZones) { $script:DNSPodRecordZones = @{ } }
    # check for the record in the cache
    if ($script:DNSPodRecordZones.ContainsKey($RecordName)) {
        $zone = $script:DNSPodRecordZones.$RecordName
    }
    if (-not $zone) {
        try {
            # get zone
            $zoneQuery = @{
                Uri = "$ApiRoot/Domain.List"
                Method = 'POST'
                Body = "login_token=$LoginToken&format=json&lang=en"
                UserAgent = $script:USER_AGENT
                ErrorAction = 'Stop'
            }
            $response = Invoke-RestMethod @zoneQuery
            if ($response.status.code -ne 1) {
                throw $response.status.message
            }
            else {
                [array]$hostedZones = $response.domains
            }
            $zone = $hostedZones | Where-Object { $RecordName -match $_.name }
            # save zone to cache
            $script:DNSPodRecordZones.$RecordName = $zone
        }
        catch { throw }
        if (-not $zone) {
            throw "Failed to find hosted zone for $RecordName"
        }
    }
    try {
        # separate the portion of the name that doesn't contain the zone name
        $recShort = ($RecordName -ireplace [regex]::Escape($zone.name), [string]::Empty).TrimEnd('.')

        # get record
        $recQuery = @{
            Uri = "$ApiRoot/Record.List"
            Method = 'POST'
            Body = "login_token=$LoginToken&format=json&lang=en&domain_id=$($zone.id)"
            UserAgent = $script:USER_AGENT
            ErrorAction = 'Stop'
        }
        $response = Invoke-RestMethod @recQuery

        if ($response.status.code -ne 1) {
            throw $response.status.message
        }
        else {
            $rec = $response.records | Where-Object {
                $_.name -eq $recShort -and
                $_.type -eq 'TXT' -and
                $_.value -eq $TxtValue
            }
        }
    }
    catch { throw }

    return @($zone, $rec)
}


if ($Task -eq 'create'){
    Add-DnsTxt $RecordName $TxtValue
}

if ($Task -eq 'delete'){
    Remove-DnsTxt $RecordName $TxtValue
}


